We developed this step by step guide so you can avoid the pitfalls that others have missed, reducing the time it takes to complete this project.
Introduction
First, I’d like to address why move to QuickBooks Online.
I was a big fan of Desktop for quite some time, but the number one issue that caused me to start recommending Online is that Desktop required I use the Accounting Interface in ConnectWise Manage to synchronize, and to do so from the computer that hosted the QuickBooks Desktop file, which was starting to become more and more difficult in a Work From Home world.
The switch to QuickBooks Online does add some recurring hard costs but this is offset by reduced labor costs associated with invoicing, reimbursements, and payments.
Personally, I had the additional benefit that QuickBooks Online was able to sync with several bank accounts that QuickBooks Desktop couldn’t handle.
Additionally, always up to date data helps provide a better client experience.
Many of our clients also use ConnectBooster to automate their payments, so we have addressed steps to maintain compatibility with that system, as well.
No guide can be perfect as software screens update, but we’ve hopefully given you a logical order of things to look for, no matter how the interfaces may change over time.
Feel free to comment on this guide or contact us if you have questions or have improvements.
Overview
We'll be following these steps to complete the migration:
- Account signups
- Migrate QuickBooks database to QuickBooks Online
- Adjust customer/vendor data (the QB migration swaps the meaning of the name fields)
- Set up Gozynta Mobius
- Change ConnectBooster (if you're using it)
Get your Accounts
The first step is to sign up for the accounts you need.
- Sign up for Gozynta Mobius
- Sign up for QuickBooks Online
- Recommend Standard as payables are trackable at that level.
- Sign up for SaaSant (we will use this tool to help with some data mapping issue, but you won’t need to maintain a long-term subscription).
- Make sure you have Administrator access to ConnectWise Manage.
Migrate to QuickBooks Online
- Open QuickBooks Desktop. Make sure you are up to date on software, transactions, bank feeds, and perform a backup.
- Single User Mode
- Rebuild Data (It will do a backup for you)
- Run a Trial Balance Report. Make sure Debits and Credits are the same and print this report for later.
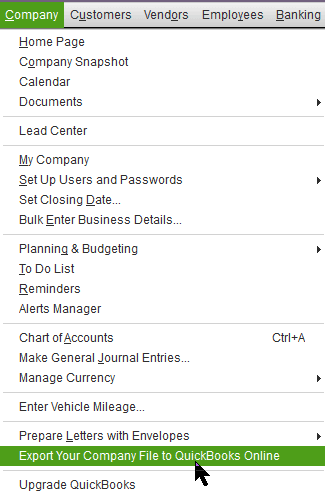
- Go to Company... Export your Company file to QuickBooks Online
- Follow the Wizard and login when asked
- Close QuickBooks Desktop, and log back on to QuickBooks Online.
- Verify that the conversion worked correctly: Run your Trial Balance report in QuickBooks Online.
Make sure Credits and Debits match again, and it’s the same number from the report you printed earlier.
Verify account balances and check registers, especially for recent transactions.
- I additionally verified my memorized transaction list.
- Large databases: The QuickBooks Online migration process has a limit on the size of the QuickBooks Desktop
database that can be converted. IF you run into those limitations then you'll need to condense your database (remove historical records from past years that you no longer need) to migrate it and then keep a backup of the un-condensed desktop database for your historical records.
- Payroll: If you're using QuickBooks Payroll then you'll need to set this up again after your migration.
Employees, salaries, and deductions do come over, but no historical paychecks or reports come over.
The conversion from QuickBooks Desktop to Online essentially reverses the Company and Display Name fields, so we need to swap them back to have our data map correctly to ConnectWise Manage.
- For Customers and Vendors copy the value in the Company field to the Display name as field and the value in the Display name as field to the Company field. If QB is not set to print on check as Display Name?
- When converting from QuickBooks Desktop to QuickBooks Online, Company and Display name switch, so copy Company into Display name, and viceversa, for Existing and especially Active Clients. Do the same for Vendors that you sync from CWM, typically employee-vendors for expense reimbursement and those vendors that you use the CWM procurement module for.
- If using Account Numbers and CWM’s GL Account Mapping is mapping to account numbers, you can update either QBO or CWM’s GL Account Mapping, but I highly recommend changing this in CWM. There is no automatic process for this, but it’s typically the lesser of data updates.
- GL remap if invoice is already closed
- Subaccounts
- Product Type (No Inventory if not really inventory)
- TAX AGENCY
- Change name in QBO to match the tax CODE
- Sign up for SaasAnt Transactions
- Login to SaasAnt with your QuickBooks Online account.
- Click “Connect” to give SaaSant permission to your QuickBooks Online data.
- Export
- Choose the “Customers” Entity
- Optional: Click Customize, Status=Active
- Filter the Company column to not Null
- Select the relevant records (if not all) and click download (tucked away at the very bottom of the screen)
- Open the CSV that is downloaded, we simply need to swap the column labels for “Company” and “Display Name As”. Typos are not forgiven, so I recommend copy and paste.
- Don’t forget to save the CSV file.
- Back in SaasAnt go to the Modify screen
- If asked to “Create New” or “Modify” records, then choose “Modify”
- Select “Browse File” and select the CSV file you just edited.
- Once the file uploads, click “Submit”
- Select “Customers” as the QuickBooks Entity.
- Visually verify your data, but it should match perfectly, and you see all green.
- Click Update QuickBooks
- Show results will give you a list of what fields were updated.
- Repeat the same for your Vendors, selecting VENDORS instead of CUSTOMERS when asked.
Setup ConnectWise Manage for QuickBooks Online & Gozynta Mobius
For detailed documentation on the Mobius setup, see their setup guide.
- Create an API Security Role
- CWM - Setup Tables, Accounting Package,
- Delete the record in Accounting Package Path tab
- In Accounting Package tab,
- Connect to ConnectWise Manage
- In ConnectWise Manage, Create API Member
- System, Members, API Members
- Give it the name “Gozynta Mobius”, Select the “Gozynta Mobius” role you created earlier.
- API Keys, + (add), Description “Gozynta Mobius”
- Get the Public Key and Private Key (You will need to enter these values in the Mobius configuration, but for security it’s not recommended to save them. If you need to re-enter them in the future you can easily re-create the API Key)
- Copy API Public, Private key from Manage into Gozynta Mobius
- Connect to QuickBooks Online
- Save & Close
- Go back to Set up QuickBooks Online,
If you're using ConnectBooster
- In Integrations, Disable your QuickBooks Desktop Sync.
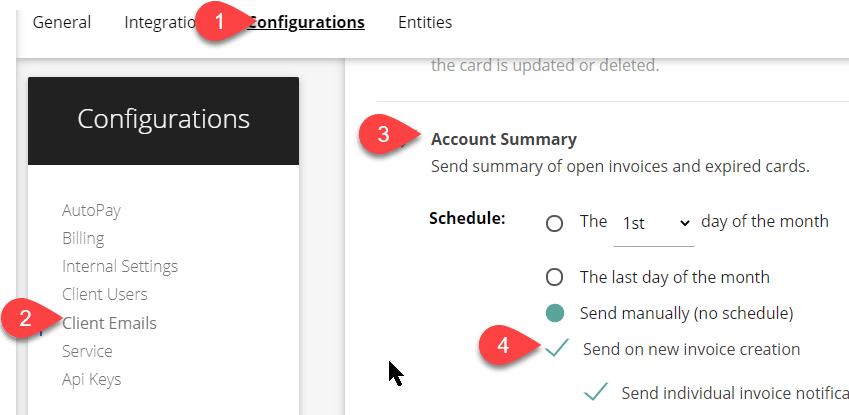
- Then in Configurations, turn off automatically sending out new invoices upon creation, if enabled:
- Contact Support@Connectbooster.com, and tell them you have migrated from QuickBooks Desktop to QuickBooks Online and have Gozynta Mobius set up and working with both ConnectWise Manage and QuickBooks Online.
Once they have those confirmations, they will add a QuickBooks Online Integration card to your system. In my case, it took less than one business hour.
Go to that card, click on settings, authenticate with QuickBooks Online and kick off your first sync.
Our test had a relatively small amount of data, and the first sync took around 10 minutes.
Note: I had an issue with a very old credit becoming unapplied in during the QuickBooks Desktop to QuickBooks Online conversion. Once I corrected it, though, ConnectBooster did not look that far back to match payments and support made some changes to get that fixed.
Testing
The basic areas of things to check are all in your QuickBooks Online lists. Types of things to check for:
- Run batches of several individual transactions in Mobius at first to check for mapping issues. Confirm that they come over the way you’d expect with no mapping errors.
- Duplication of List items
- Vendors – common issue
- Clients – common issue
- Items – does not tend to be problematic
- Billing Terms – does not tend to be problematic
- Verify sales tax mapping.
- To retry batched transaction:
- Delete the batch in ConnectWise Manage
- Delete the created transaction in QuickBooks Online
- Run a new batch
- It’s possible to run the above export, conversion, and test processes more than once. This will allow you to do a test conversion ahead of your go-live.
- Redoing the QuickBooks Desktop to QuickBooks Online conversion will create a new QBO company.
- You can use QuickBooks Online’s trial period so that you’re not paying for each of these, and these trial companies will eventually expire and be deleted.
- Make sure to keep track of all batches created in ConnectWise during your testing so that you can delete all of them. They can then get rebatched into the new company file.
Cleaning Up
- At a minimum, rename your QuickBooks Desktop file so that no one accidently opens it. Better yet,
- uninstall QuickBooks Web Connector
- Uninstall QuickBooks Desktop
- In QuickBooks Online
- Delete any test invoices/bills
- If any duplication in any list occurred, delete/inactivate those duplicates
- In ConnectWise Manage, for all test invoices/bills,
- Unbatch,
- Set Invoice(s) to open (this can be done in bulk)
- Delete Invoices
- From Invoicing screen drill into each test record and delete original record
Adding Automation
- In ConnectBooster
- Reenable automatic synchronization for QuickBooks Online for it to continue functioning without you.
- If you had it set before, reenable Automatic Invoice Sending on Creation.
- After going through a billing cycle without any issues, you can then turn on automatic syncing from Gozynta
Mobius.
- Re-connect automatic bank synchronization in QuickBooks Online
- I pulled transactions “additionally” from today, though I had already synchronized in Desktop (I did this on a Saturday, so this allowed a test with no duplication).
Gozynta's Eureka Process can help you with all of your tool management.


 by Allen Edwards
